Five Herbs and Vegetables to Use as Cut Flowers
Those of you who know us know that we love to grow flowers.
But long before we started growing flowers, we started by growing edible plants - vegetables and herbs in particular.
I think a lot of people start out growing vegetables - it makes sense since growing your own food is one of the most magical and rewarding things about gardening! Fresh basil cut from the garden, picking your own blackberries, digging your own potatoes and the taste of a home-grown tomato picked fresh from the vine is something that ranks up there as one of life’s finest experiences.
We still grow a lot of edibles - although ironically not so much for eating now, but as cut flower materials! Tucked into bouquets sold at market, mixed into centerpieces for weddings, bulking out bridal bouquets and even gracing boutonnieres and corsage wristlets and bridal haircombs, there’s just something amazing about using materials that would normally be at home in the kitchen in floral arrangements.
It also allows you to have a renewed appreciation for plants that you previously may have grown for the table but are instead growing for the vase, enjoying properties like scent and color and form that may have otherwise been missed!
Here are five of our favorite herbs and vegetables that we like growing for using in cut flower arrangements
Basil
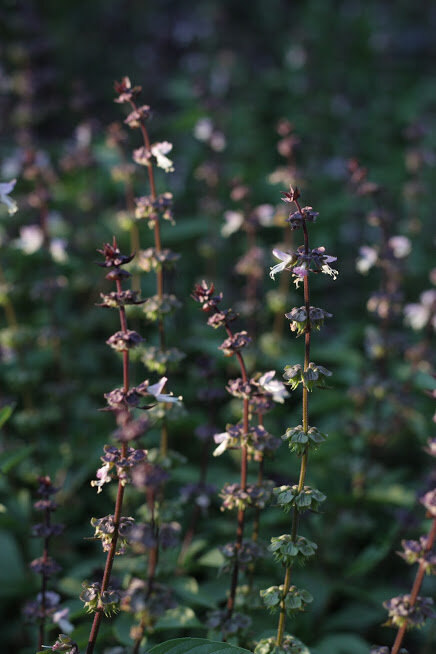
For those of you who know us, you know that we grow a lot of basil. Not just for caprese salad and pesto sauce, but for its use in floral arrangements and design as well!
Drought tolerant, easy to start from direct sowing, and lending a beautiful form, glossy leafed foliage and fantastic herbal scent to any arrangement it is a part of, basil is one of the floral workhorses on our farm and is tucked into every single bouquet, mason jar, centerpiece and installation that we make during the summer.
It’s quite underrated as a floral material as well - you have to really appreciate the way that it fills out arrangements and just produces bucket after bucket of floral material week after week. We really enjoy the regular ‘Genovese’ basil for its lovely succulent green leaves and white flowers and gorgeous scent, but we also really like ‘Cinnamon’ for its dark purple-green leaves and flower stalks. ‘Lemon’ is also a great variety with chartreuse colored leaves and light-green calyxes and white flowers and a lovely citrusy lemon scent.
STARTING BASIL: Basil likes heat, so either start it on heat mats or in a germination chamber or direct sow it once the ground starts warming up in the summer. I find that it germinates pretty quickly if the ground is warm and the sun is shining, but when started indoor as plugs they grow pretty rapidly to transplant stage.
GROWING OUT BASIL: Basil requires little from us as far as cultivation, just the minimum amount of water and nutrients to grow and produce plenty of foliage and flowers for you all season long. You can either pinch out the first stem and encourage long and prolific side shoots or you can make your first pinch the first harvest - and then encourage the basil plant to branch out from there. We actually do both, pinching half the crop to encourage a later bloom and harvesting the un-pinched basil first.
HARVESTING BASIL: Basil actually is much more resistance to wilting if grown in dry and harsh conditions - but if you’re growing in moist and wet environments, there are a few tips to help prevent your basil from wilting. First of all, make sure your basil is a bit woody - if you shake the stem and it is soft and wobbly up top, it won’t hydrate. General rule is that we wait until basil starts flowering before harvesting it - it won’t be ready before then. Make sure that it’s harvested in the late evening or early morning when the temperatures are the coolest, and get it into water immediately after cutting it or it WILL flop. We always harvest ours with a cup of Quickdip nearby - this allows for great hydration of the basil and we get no flopping whatsoever. Strip off the lower leaves and stems to encourage good hydration and reduce the moisture lost through transpiration.
DESIGNING WITH BASIL: Basil can be used as a foliage by showing off the beautiful glossy leaves, but can also be used as a filler if the flowering stems are used. We also sometimes use basil as a vertical element due to its spike-like shape as well, similar to a snapdragon or veronica due to its inflorescence. You can even dry the seedheads and use in winter work - they are a wonderful structural element in bouquets and wreath work.
Cardoon

Although cardoons are usually grown for their edible stems that are blanched and enjoyed with a lot of butter, they have been adopted as more of an ornamental garden plant due to their wonderful structure with their giant protea-like flowers and large stature.
We grow them for their flowers with the ultraviolet petals and spiky, large heads which are a wonderful addition to both fresh and dried arrangements but we also grow them for their foliage. The large serrated leaves remind me of dragon wings with their large silvery appearance and graceful curved form.
The foliage is pretty amazing, holding up well in the vase for up to a week and has that silver-green cast that works well with just about any color of floral material under the sun. The scale of the leaves is impressive too - getting up to three to four feet in some cases, allowing for some pretty magnificent and awesome designs as a result!
The nice thing too is that cardoons are perennial up to zone 6, making a relatively hardy plant that is also one of the first to sprout in the spring, offering foliage and color long before the rest of the garden wakes up.
STARTING CARDOONS: Cardoons are relatively easy to start from seed so long as its fresh. The seeds are large - the size of a bean - and are easy to handle. Seeds take a while to sprout - usually around 2 weeks for us, although you can get them to pop up a little quicker with some heat. We start them off in 2 inch pots to give them enough space to grow a good root system.
GROWING OUT CARDOONS: We usually plant out our cardoons in late spring once the danger of frost is past, planting into good rich soil with decent drainage. They will grow pretty quickly if given regular water and nutrients, getting large 3’ leaves in one season. They will usually start flowering in their second year, sending up their flower stalks in late summer.
HARVESTING CARDOONS: Leaves can be harvested at any point, although we usually wait until midsummer to let them get large enough to harvest and use (they’re also less inclined to wilt at that point). For the flowers, we wait until the beautiful violet petals start to open at the top of the thistle-like bloom - harvesting and getting them into water as soon as we can. They are seriously one of our favorite flowers - so unique, so large, so awesome - and we look forward to their presence every year.
DESIGNING WITH CARDOONS: The foliage as mentioned is that coveted silvery-green coloration that pairs well with white and blushes and other greens, acting as a foil for smaller materials and pairing well with big fluffy multi-petaled materials. The scale can be problematic sometimes - feel free to cut and chop it up like you would a palm leaf to fit your design.
The flowers are such a massive bloom that it’s hard to use them as anything but a focal flower. They are what I call the locally-grown alternative to the protea - just as eye-catching and just as durable, even drying well for use in dried arrangements and are a favorite with customers and florists alike.
Fennel

Fennel is similar as far as form and appearance to dill - with the exception that where dill is a one-and-done plant, fennel is a cut-and-come-again. Just a few fennel plants will provide you with the beautiful yellow-green umbellifer flowers all season long (all the way to frost). And if you’re growing the beautiful bronze variety, it is a perennial that will come back year after year, getting bigger and bigger.
I particularly love the bronze variety for its uniquely colored foliage - although I don’t use the actual fronds from the plant, the foliage that comes attached to a flower stem and the dark streaking of color in the stem itself lends itself well to wedding work - the dark grey-ish coloration works well with the muddied and soft colors that are so popular these days.
STARTING FENNEL: Fennel grows great from seed. We prefer to start ours off by growing plugs - fennel tends to need a certain size before it starts taking off and we find it easier to get them growing in the plugs instead of in the ground where they can very easily be lost.
GROWING ON FENNEL: Fennel doesn’t need to much, just a decent amount of water and nutrients and light to start creating its bulb. Once it has created its bulb and has gotten to a decent size, it becomes much more drought tolerant - the thick layers of waxy vegetation helping it to resist drying out much more. Keep growing it on until the days get long and the temperature becomes hot - then it will start blooming for you.
HARVESTING FENNEL: We harvest fennel flowers when the individual florets have opened and bloomed, but before it starts forming seed. These flowers are the easiest to work with, although I don’t technically mind the seed pods either - they remind me of the same texture as seeded eucalyptus and are an easy textural element to add to any design.
DESIGNING WITH FENNEL: You can use it as either a textural accent or filler in a piece, or you can display it on its own. Some people like to tuck flowers in and amongst the thread-like stamens of the flowers, while others like to feature it floating above or on the side of an arrangement. You’ll need to try it out and figure how you like using it as a material!
Lippia

Known as “Mexican oregano”, lippia is a really interesting plant. Not really an oregano, it’s actually in the verbena family and has those same velvety, soft leaves that verbena is well known for. It’s a tender plant that can only be grown in the warmest environments that don’t get a frost (Zone 10-11), but it grows pretty quickly into a small shrub-like plant that gets 3-4” in diameter in just one growing season. Fantastic little plant!
We bought it originally for use in posole and Latin cuisine, but found that its woody stems and vigorous growth habit made it far more valuable as a design element in arrangements. It adds a nice airy element and the soft and small-scale foliage makes for a great element when added to other floral materials and larger-leafed foliages.
STARTING LIPPIA: Unfortunately we’ve only been able to find lippia as plugs or plants, meaning more than likely it either doesn’t produce seed or the germination is poor. Either way, it’s worth getting your order in early to ensure that you can snag some before the rush of the growing season starts. You could also overwinter it in your house or a garage so long as you don’t let it freeze and take cuttings to propagate it.
GROWING ON LIPPIA: Lippia likes heat and a lot of it. The hotter the better to be honest! And so long as you give it some occasional moisture and decent nutrition, it will go on to grow into a small shrub for you by the end of the season. Because it has a great scented leaf, we don’t really have any issues with it as far as pests go either.
HARVESTING LIPPIA: Definitely needs to be harvested in the coolest part of the day to ensure that it doesn’t go floppy on you. We usually wait until it starts flowering, after which it holds up a lot better, and although the white flowers don’t last a long time it does add a little bit of elegance and daintiness to any arrangement is part of.
DESIGNING WITH LIPPIA: Lippia is a very unique material because it it’s not just a typical filler or foliage - it is more woody and has more structure than any other herb, allowing for more shaping and more direction when used in an arrangement. It’s small white flowers also mean that it can add more elegance and interest visually when used with other materials.
Tomatoes

Tomatoes are a surprisingly interesting cut flower material. Although you can’t really use it as a foliage (which is a shame since the scent of tomato foliage is one of my favorite scents of summer) you can use the fruiting stems in arrangements.
You can either use the stems as green fruit, which blends in well with other greenery and gives a very fresh appearance or you can use the stems when the fruit has started to color up, allowing for a more autumnal or rustic appearance.
My current favorite variety is ‘Red Currant’ - an indeterminate variety tomato that produces strings of tiny little spherical tomatoes, each about the size of a pearl (¼” an inch or so in diameter) and is incredibly productive, producing early and heavily throughout the season so long as you keep it harvested.
There are a lot of other great varieties out there to try as far as colorful tomatoes - ‘Indigo Rose’ being a dark and glossy purple, almost black coloration, ‘Blue Cream’ berries a light yellow splashed with a dark flush of burgundy around the top or ‘Lucky Tiger’ with bright green and red streaked and swirled around the whole of the fruit as well.
Tomatoes are harvested best in the morning, and is best if you strip the stem of all foliage to prevent wilting (or at least most of it - sometimes I like to leave a few small leaves at the tip of the stem to add more visual interest in arrangements). They hold up decently in arrangements, usually around 4-5 days for us, and sometimes will continue to color-up in the arrangement as they age, adding interest and color to the arrangement.
STARTING TOMATOES: Tomatoes are easily started from seed, usually earlier on to ensure that you give them enough time to get to the size where they will get large and bear fruit. Especially If you’re in a colder climate with a shorter summer, get them started with heat (a heat mat or germination chamber) early on to ensure they get a headstart. We start ours in soil blocks for reduced transplant shock.
GROWING ON TOMATOES: Depending on how many you grow, you can use any one of the many trellising options available to grow them out. We prefer to use the tomato branches for hanging over the edges of containers, so we will use T-posts and baling twine to corral them until they have grown tall enough to cascade over the sides of the corral and we can harvest from there.
HARVESTING TOMATOES: Wait until fruits have formed - you can harvest either as green fruits or as fully colored - and then harvest the entire stem. Strip off all foliage (it will wilt) and let it rest in a bucket to hydrate. We find if we want the colorful fruit to harvest just when the first tomato is fully colored - if you wait until the whole “bunch” of tomatoes is colored up, you may end up losing overripe tomatoes.
DESIGNING WITH TOMATOES: We find that tomatoes are best used as little flourishes along the edges of centerpieces, a nice textural contrast to other leafy and fluffy and disc shapes or woven between other stems and elements. They also make for a very interesting addition to necklaces, boutonnieres and other wearables.
I hope that this inspires you to grow some edible plants specifically for using as a cut flower material or in floral design this year. Or at least cutting from your vegetable garden or edible crops to enjoy in a different manner!
If you’re interested in starting a flower farm or growing cut flowers as part of your business, you may be interested in our Flower Farmer eBook bundle that covers growing edible crops like calendula, sage, basil, ornamental oregano as well as everything from growing cut flowers to sell to florists to small scale flower production. Great for the newbie flower farmer, or even if you’re just looking to get a feel for things as a flower farmer!