12 Spring Blooming Bulbs to Plant for Cut Flowers
As we head into the late part of fall and the temperatures start dropping and the garden and nature starts getting ready for the off-season, it’s time to think about next year - specifically spring.
While everything in spring seems exciting - it seems there’s something new popping up and growing every day, we’ve found our early spring to be a bit sparse on blooms. And this is the time of year when we are just dying for flowers - the scent, the color, the delicate form and texture, the fact that there is something so vibrant and alive is such an important and invigorating ritual for us.
While we also start lots of hardy annuals and biennials, the first to bloom are the bulbs and corms - sometimes as early as February and March for us! - so we like to ensure that we have plenty of flowers blooming in those early months.
We’ve written a bit about our favorite spring flowering bulbs including the care they need, their growth habits, cultivation needs and how to harvest and utilize them as cut flowers indoors.
Anemones

Anemones - in this case Anemone coronaria (not to be confused with Anemone hupuhensis that blooms in fall) are one of our favorite flowers to bloom in the spring.
Hardy enough to survive a mild winter (and still tolerant enough of both heat and cold to survive a mild spring) anemones will produce plenty of big, blousy, open-petalled flowers - and will keep on producing for weeks and weeks.
Although similar in bloom time and growth and cultivation to its counterpart ranunculus (who is a bit less hardy but produces just as well), anemones tend to bloom for a lot longer period of time. If grown under protection here, we often find they can produce for up to three months!
Although ranunculus take the prize for the layer upon layer upon layer of silky petals, anemones are beautiful in their own right with their broad, silken petals appearing almost like a giant poppy with a dark or light eye (depending on the variety) and are perfectly as a focal flower with their center drawing the visual attention right away.
Cultivation
Anemones are grown from corms- dried wrinkled roots that appear disappointingly small upon arrival. However, don’t get discouraged - these unlikely little corms will produce a beautiful, healthy plant that will go on to produce beautiful blooms for you, I promise!
You’ll want to start off by hydrating your corms first - this will allow them to take up water and wake them up. You’re basically simulating the fall/winter moisture that would activate them in their native Mediterranean climate by soaking them in water.
We soak our anemone corms in cold, clean water overnight, allowing them to plump up. We then plant them into potting mix in 72-cell trays and leave them at 70 F to start growing. They’ll first start sprouting a lot of roots - you can check to see their progress by digging up one of the corms - after which they’ll start putting up a green shoot.
Once they’ve filled their cell, we’ll plant them out - either directly into the ground, or we’ll pot them up into successively bigger containers if the weather isn’t cooperating with us. Since we grow anemones during the colder part of the year, they grow much slower than other bulbs will during warmer parts of the year, so we’re not too worried about them getting rootbound.
Plant the anemone corms 3” deep in a good, well-draining location. You can also plant them into pots as well, since they make wonderful container plants (although they won’t get as big and sturdy as if they are in the ground) Water them in well after planting.
Anemones will continue to put out green growth and leaves as the season progresses into spring. They will start off blooming as the weather gets warmer and day length increases past 10 hours. They will flower first on short stems (literally just a few inches tall at the beginning) which caused alarm for us at first - but they will continue to get longer and longer stems as they continue to grow. They will increase in size and vigor, and you’ll be able to harvest 12-18” stemmed flowers later on.
Anemones will continue to bloom until the weather gets too hot - 80 F or so. We can cheat past the 80’s a little bit because we live in a high desert environment that cools down at night, so we can grow a bit longer than that. But when the temperatures rise above 80 F during the day, the anemones will start to go dormant and you’ll see their leaves yellowing and they will stop blooming.
Let the plants continue to yellow and wither back - you want to do this so that the plant sends all the remaining energy and effort into the corm, which you’re going to save. Let the plant die back completely, and then dig them up. Store the corms in a dry and cool place until you can plant them again the following year.
Harvesting
The best stage to harvest anemones is when the collar (the lacy green leaves that cup around the anemone bud) is about ¼” below the petals. If the collar is up around the petals, it’s too soon - if the collar is down onto the stem, it’s too late. Of course you can still harvest flowers for the vase at any point, but you’ll get the best performance when you harvest at the correct time.
Cut into cold, clean water, then arrange as desired. Make sure to keep the water in the vase clean- check for any signs of cloudiness or dirt in the water and change regularly. You can expect anemones to last around a week or so in the vase.
Crocus
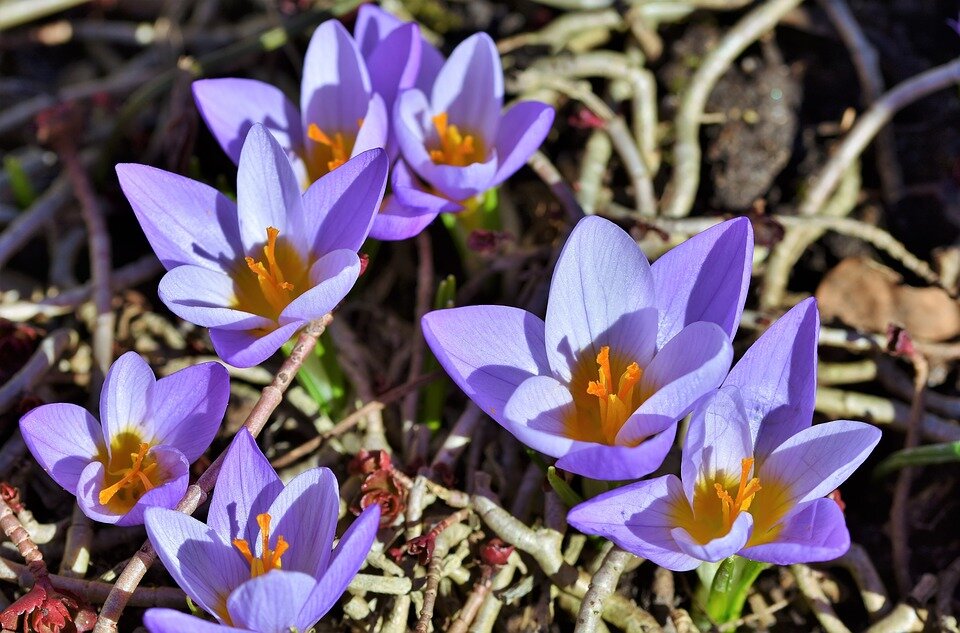
Crocus are one of the earlier flowering bulbs in spring. Although not a great cut flower since they are so short, their color and beauty so early on in the season when we are all hungry for flowers is a wonderful thing.
Crocuses are one of those bulbs that are a happy surprise in the spring. They are so short that you’re likely to miss them if you’re standing and viewing the garden from afar - but get in close and you’re in for a treat with the delicate cupped petals and brilliant orange-yellow stamens in center. The spice saffron is actually harvested from a particular crocus - with those same brilliantly colored stamens also present in their non-culinary counterparts.
Cultivation
Crocuses are one of the easier flowers to grow - you simply plant them in the ground around 5” deep (2-3x the length of the bulb) in the fall. They thrive in the cold, and will survive a winter with no major issues. You’ll want to ensure they do get good drainage however - a very wet winter with lots of freezes and subsequent thawing can damage any bulb.
Crocuses also are excellent for forcing indoors. Pot up crocus and then chill for eight to ten weeks at around 40 F (outside in the cold should work just fine), then bring inside and watch them grow and bloom. This is actually our favorite way of enjoying crocuses indoors - since their stems are short, it’s easier to enjoy them on the plant, and since the plant is so diminutive why not enjoy the entire plant itself?
Crocuses will bloom early on - as early as the end of March for us, April for most, and there’s no special care necessarily needed. Some people will plant crocus in their lawns, since they will bloom before the first trim of the grass is needed. This lends to a very nice naturalistic effect, especially once the crocuses start multiplying.
Once the flowers are spent, the crocuses will start dying back. Make sure to allow them to die back fully before either cutting or picking dried and spent leaves to ensure they will come back the next year.
Harvesting
Although crocuses aren’t superb cut flowers - their stems are short and their vase life is relatively short - they do make for wonderful bud vase arrangements. If I’m cutting crocuses for arrangements, I’ll cut them when they are just starting to open for the maximum vase life.
Alternatively, you could also pull them up - bulb and all - and use them that way as a flower. I love the look of them tucked into a low dish or bowl and mixed with other materials to create a low and lush arrangement.
Daffodils (Narcissus)

Daffodils are one of the happiest, cheery flowers to bloom in spring. Everyone is of course familiar with the brightly colored yellow daffodils that are so prevalent in landscapes and photographs, but there are a multitude of shapes, forms, colors and varieties that all bloom at different times of spring to the point where one could simply plant daffodils alone and have an entire garden devoted to them!
Daffodils are great in that they are readily perennial (unlike their more finicky counterparts in the tulip) and are especially great for us since they require a shorter period of cold than tulips (we have such a mild winter, it can be hard for the cooler-loving bulbs to get enough of a chill sometimes). They are also one of the bulbs that deer and rodents don’t like, a huge plus for some gardeners!
Cultivation
Daffodil bulbs are best planted in fall to allow for a proper period of cold, and should be planted in full sun to part shade in well draining soil. Although daffodils do like a bit of moisture to grow their best, they should not sit in standing water or moisture - this will cause them to rot.
Plant them in the ground at 4-6” deep - smaller varieties plant more shallowly, larger varieties plant deeper. We like to plant daffodils in and amongst other perennials and shrubs, since this will allow for a naturally diverse and dynamic display during the spring.
Daffodils will start to sprout as early as January here, with faster and more prominent growth observed as the days get longer and the temperatures rise. Most of our daffodils will bloom in April, with the earlier varieties blooming as early as the end of March and continuing on into May depending on the variety and their location.
Daffodil foliage is very sturdy and hardy to freezing temperatures, but the flowers are not. If you’re going to have a hard freeze coming, you may want to cover the developing buds and flowers with either a glass cloche or floating row cover to insulate them. If they do get hit with a freeze, you’ll see it as brown spots on their petals as a result of the damage.
Harvesting
Daffodils are best picked for the vase when the buds haven’t opened yet, known as the “gooseneck” stage. The bud should be fully colored but not yet opening, and not yet fully upright but still with a bit of bend to the stem (thus the gooseneck description).
Harvest daffodils with a sharp pair of snips that will make the cut at the base of the stem. Daffodils will exude a sap from their stems - this sap is toxic to other flowers, and will decrease the vase life of your flowers unless you condition them properly to not exude this sap. To condition your daffodils, you’ll want to let the cut daffodils sit in a container of clean water by themselves for a few hours. This conditioning will allow the cuts to seal over and the daffodils will stop exuding the sap as a result.
You can expect a week from daffodils when cut in the gooseneck stage and properly conditioned - less if the flowers have opened already, but they will still be enjoyable, if a bit more fleeting.
Fritillarias

Fritillarias are a wonderful addition to the spring bulbs because they are so very different from the other bulbs you can grow this time of year. As opposed to the soft, fluffy, classic tulips and daffodils, fritillarias are dark and dramatic and full of structure and form that is such a brilliant contrast. They are drama - and we love them for it!
Although everyone knows of the gigantic Crown Imperial fritillaria with its gigantic alien cephalopod-like orange-petalled bloom, there are other fritillarias that although more diminutive are still beautiful in their own right.
We like the very British and very elegant Snakeshead fritillary Fritillaria meleagris. Its checkerboard burgundy pattern covers delicate silken petals that elegantly drape downward, creating a sort of fluttery bell-shaped bloom that does spectacularly well in floral arrangements as well as out in the garden.
There's also the delicate and petite flowering Fritillaria ulva-vulpis (previously known as Fritillaria assyriaca) that instead of the large dramatic blooms has small diminutive downward hanging bell-shaped blooms with a bright gold interior - perfect for adding an elegant touch to a floral arrangement or enjoying for its delicate beauty out in the garden.
Cultivation
Fritillarias come from the Mediterranean (like many of the bulbs) and therefore enjoy a location in full sun with good draining soil and not sitting in standing water (which can cause the bulbs to rot). We find that fritillarias like a bit more nutrition and fertilizer than other bulbs, so a rich soil amended with compost and bulb fertilizer helps them to perform at their best.
Dig a hole 5-6” deep and place the bulb at the base of the hole. Cover and water in gently, then let nature take care of the rest. Fritillarias will start putting out foliage and developing a bit later than daffodils or tulips - usually in April - and will continue to put out their grass-like leaves until the buds start developing. If you find that your fritillarias are prone to flopping, you may want to either think about staking them using a small bamboo stake, or you may even want to make a trellis or corral if you have a whole bed of them.
Harvesting
Fritillarias are best harvested when they are just starting to open for the best vase life. We harvest F. meleagris and F. ulva-vulpis when the first bud on the stem is starting to open - this will extend the vase life by allowing you to enjoy the flower from the time when it is in bud form all the way through until all the buds have finished blooming.
If you’re harvesting F. imperialis, we recommend cutting when the buds are colored up but before the flowers start opening up fully - this will again allow for the longest vase life and enjoyment of the flower.
Cut your fritillarias into cold, clean water and then use in your designs as desired.
Freesia

Freesia
Although we love the delicate trailing crocosmia-like blooms of freesia, the most enchanting thing about freesia is their beautiful scent - delicately floral and fruity, a bright note that always reminds me of spring.
Freesias are similar to ranunculus and anemones in that they like cool weather - but still above freezing (they won’t survive if their corms freeze). Best grown in minimally heated greenhouses, you can still grow freesias if you can offer them some cover - either in a sheltered place or with a bit of row cover or in a high tunnel to save them from the worst of the weather. I still wouldn’t recommend growing them in an area where you get much below 30 F for extended periods of time unless you’re able to provide them some extra heat to survive the freezes.
We have grown freesia on a couple occasions - they are honestly a labor of love since they require a lot of pampering and don’t produce the way other tender bulbs like ranunculus and anemones do - and prefer to just purchase ours from commercial growers now.
Cultivation
Unlike anemones and ranunculus, freesias come more like iris reticulata or allium bulbs with light papery coverings. Plant the bulb pointed end up deep into the soil, around 4-5” deep. Water them in and then keep them lightly moist (but not wet) and cool (under 45 F) until they start to sprout - after which, they can use warmer temperatures (such as within a covered hoop house or as the spring gets warmer) to grow well and flower.
We usually grow our freesias in pots. We’ll plant them during the winter, where they stay in our unheated but sheltered porch and they grow very slowly. They’ll continue to grow until they start to flower sometime in the spring.
Generally, we don’t stake or net our plants - I like when they’re floppy and have some interesting curves and twists - but if you’re wanting long straight stems you’ll want to either individually stake the plants or net them to ensure long and straight stems.
Freesias will bloom for a few weeks and will stop blooming when the temperatures get above 80 F. Like anemones and ranunculus, the plants will start to yellow and wither once the temperatures are consistently in the 80’s. Leave the foliage on the plants and let them die back naturally so that the corm is able to store the energy from the plant. Dig up your freesias after they’ve died back and store them in a cool, dry place until the next fall planting
Harvesting
Freesia will usually only give one large stem, with a couple shorter side stems that are still just as beautiful and fragrant as the main one, but aren’t quite as impressive. We usually harvest the entire stem and then either enjoy them as a singular impressive stem or cut them into a small bundle of fragrant blooms. On a random, very lucky occasion we’ll get a rebloom on the plant - we’re not sure exactly how to encourage it, but just accept it for the blessing that it is.
The blooms will last at least a week (sometimes longer) with each individual floret opening in succession along the stem. If you need to, you can always remove the spent florets as they start to age to keep the stem looking fresh.
Hyacinths

Some of the most fragrant and wonderful flowers, hyacinths are a favorite bulb of ours to grow both in spring as well as forcing them into bloom during the winter.
The big, squat, cylindrical blooms that are composed of dozens of individual florets look tropical and exotic in a way. Named after the ill-fated Spartan prince and lover of Apollo, hyacinths have been cultivated for a very long time and are staples of the spring garden.
Hyacinths come in a wide range of colors - pure white, lavender, dark blue, pink, even a light peach color that is a nice change from the usual punchy colors of spring.
Cultivation
Hyacinths require a chilling period, same as other bulbs, approximately 8-12 weeks at a temperature of around 40 F (depending on the variety). This is required to trigger the bloom of the hyacinth bulb, simulating a cold winter that would inform the bulb that the worst of winter is over and spring is on its way.
You can do it one of two ways - either plant them in the ground or start them in a fridge or floral cooler. Either way, you should keep the bulbs dark and cold for an extended period of time. If in the ground, they’ll come up in spring - if in the fridge, when you take them out when you see a pale yellow sprout starting to form - and you’ll know it’s time to plant them out
Hyacinths are best planted in the fall to allow for a good length of time for the chilling period. Plant them 4” deep, pointy-side up and cover and water them in and leave them alone. If planted in the ground, hyacinths don’t require much extra care. They’ll push up in the spring as the temperature rises, and then will go on to flower.
Many flower farmers grow hyacinths in a container such as a crate or large planter (you can even grow them in soil-less growing operations or hydroponically) which allows for easier cultivation and less mess. It also allows for harvesting hyacinths with the bulb much more easily, which I’ll get into in a minute.
Harvesting
Hyacinths can be harvested one of two ways - with the bulb on, or cutting the flower at the base of the stem. When harvested like any other flower and cutting at the base of the plant, the resulting flower is good - it can be used in short arrangements and will allow for the bulb to rebloom next year (although not quite as spectacular as the first year).
On the other hand, if you harvest the entire hyacinth - bulb and all - it will have a much longer vase life and will also add a bit of height to the flower overall. This is how a lot of professional floral designers will use hyacinths. Just be aware that if you’re making an arrangement, you should obscure the base of the container to ensure the bulb can’t be seen!
Iris Reticulata

One of the first flowers to bloom in the garden for us in the spring, they are super short. Barely 3-4” from the base of the plant to the top of the bloom, they are a short-lived, but absolutely delightful flower for early spring.
They have the typical wide petals and open structure of an iris, but their foliage is much more cylindrical and slim compared to a bearded iris for example - appearing more like the blades of an allium. Their bulbs are small and covered with a white papery covering - looking more like a clove of garlic than an iris rhizome that we were more familiar with.
Cultivation
Iris reticulata prefer a full sun location (at least during the early spring, and can be planted under trees and shrubs that will only leaf out later) and well draining soil to prevent rotting of the bulbs.
You can also grow iris reticulata in pots. Given some good draining potting mix and getting enough of a chilling period, they will grow and flower wonderfully even in relatively small pots. We pack ours pretty closely as well to ensure a magnificent display of flowers.
Dig a small hole and plant the bulbs 2-3” deep.
Growing
Iris reticulata are very hardy and require very little care once they’ve been planted. If planted out in the landscape or garden, make sure you remember where they are planted so you don’t forget about where they are located (and to make sure you don’t accidentally weed them out or let them get choked out by other plants).
Harvesting
Iris reticulata can be snipped as a short lived cut flower, suitable really for a bud vase arrangement or used in a boutonniere or corsage flower (if wired and taped). Although they don’t have an extremely long vase life (a few days at most) they are wonderful to enjoy in early spring, and are fragrant to boot!
Leucojums (Giant Snowdrops)

The tiny snowdrops (Galanthus spp.) are familiar to most people, blooming early on in the spring with their little white flowers. They are delightful in the garden, but don’t make a good cut flower.
Luckily for us, there is a larger version of the snowdrop known as the Leucojums. Standing 24” tall with multiple delicate white bell-shaped flowers that hang and nod on their stems, they are a great addition as a cut flower for designing or incorporated into bouquets. Graceful and elegant, I also think they look quite a bit like a more robust lily of the valley bloom, excellent when paired with tulips and ranunculus for spring.
Cultivation
Leucojums grow best in partial or full sun, but like a little bit more moisture than the typical bulb during the summer. You’ll still want to plant them in rich, well-draining soil for the best blooms and plant health. Dig a hole 2-3” deep and fill back in with the soil. Water them in, and you’re good to go.
Leucojums will start off by throwing up some narrow blades of foliage. The plants will continue to grow and gain in size until they start throwing up flower stalks that will then go on to bloom later in the spring. As long as they get some decent moisture, they don’t really need much else to grow well - a pretty hands-off plant
Harvesting
Leucojums are best harvested when the first bud on their stem starts to open. The other buds will continue to bloom on the stem when in the vase and kept in good condition. Harvesting the stem will also encourage the plant to rebloom next year as well.
Leucojums will last a week if harvested when just starting to open. So long as you keep the water clean and keep it in relatively cool conditions, it will perform admirably in the vase.
Muscari

Muscari (also known as grape hyacinths) are a special flower for us because when we first moved onto our property, they were one of the few flowers to come with it. They were naturalized in the lawn and garden, and were so cheery that first spring, popping out of the soil with their clusters of round, smooth buds.
Muscari are generally rather short flowers - 8-10” at their longest - but are wonderful additions to the garden as well as in the vase. We particularly like to use muscari in low and shallow arrangements to add a little pop of color and texture.
Cultivation
Muscari are best planted in the fall and chilled for 12-14 weeks at 40 F. They usually get that chilling period when planted in the ground, but if you’re living in a warmer climate, you can chill them in the refrigerator or in a cooler.
Dig a hole 2-3” deep and plant each muscari bulb with their basal plate (and roots) facing downwards. Cover with soil, water in well, and then wait until they bloom in spring.
Muscari don’t need much attention or care while growing. They’ll start off as a grassy-looking foliage first (careful not to pull them up by mistaking them for a weed!) that will continue to grow and put out more foliage until the first of the blooms start to pop up.
Harvesting
As mentioned previously, muscari don’t get super tall. Grown in shade, the stems get a little bit longer, but still not super tall.
To harvest muscari, cut as low as possible to ensure you get the most stem that you can. I’ve even seen floral designers pull up the entire plant (bulb and all) to use in an arrangement, tucking the entire plant into the design.
Cut into clean water, muscari will last a while - 3-5 days when cut in bud form - and will also move and change as the stems continue to grow a little bit in the vase.
Paperwhites
Paperwhites are actually a type of semi-hardy daffodil. Traditionally grown indoors as a forced bulb, they aren’t frost hardy, so are only reliably perennial in zones 9-10. If you live in a colder zone, you’ll probably just want to pitch your paper white bulbs and replant new ones every year if you want to consistently have blooms.
We grow them as a forced bulb indoors, and then after blooming we plant them out in a sheltered location next to a south-facing wall - they will overwinter there due to our mild and dry winters, although they take a couple years to rebloom so we will buy new bulbs every year.
Cultivation
Paperwhites should be planted in well draining medium such as a gritty compost or compost amended with perlite or gravel to encouraged good drainage.
When planting paperwhites, you’ll want to actually plant the top of the bulb above the level of the soil (pointy end up) and the bottom in the soil to form a root system.
If planting outside, we’ll plant them a bit deeper - 2-3” deep to allow for better thermal insulation.
After a good water to settle in the soil, paperwhites will start to grow roots, then foliage, and then finally flower after around 4-6 weeks after planting.
Harvesting
Paperwhites can be enjoyed as an indoor forced bulb, but they can also be enjoyed as a cut flower as well. Similar to garden daffodils, they exude sap - so make sure that you condition the stems by soaking them in a container of water for around 2-3 minutes to allow them to callous over and prevent them from exuding sap. Cut when the paperwhites are in the gooseneck stage or just starting to open for the longest vase life.
Ranunculus

Ranunculus are one of the most colorful, beautifully shaped spring flowers that we grow. We also like ranunculus because they will (like anemones) throw out multiple blooms on long stems that will fill many an arrangement and bouquet and vase during the spring.
They also come in wonderful colors and forms - anywhere from bright red, yellow, orange and pink to pale peaches and whites and pinks as well as picoteed and ombre colored forms and even a version with chartreuse green centers - all great and wonderful in bringing a bit of spring beauty.
There are even the beautiful single-petalled gigantic butterfly ranunculus - so called due to their large, broad petals appearing similar to the insects they receive their moniker from - although they are only available for professional growers at the moment.
Although their blooms are beautiful, I love ranunculus for the way their stems curve and twist and swirl - their shape and form are unlike any other flower out there, and they really add a very special elegance and shape to any arrangement they are a part of.
Cultivation
Ranunculus are best grown in a bright and cool environment, same as anemones and freesias. It’s important to not let the corms freeze - they won’t survive a hard freeze in the ground, but even if they get a little bit of frost damage to their leaves they will still do just fine so long as they don’t freeze solid.
We soak our ranunculus overnight in cold, clean water until the corms are plumped up and fully hydrated. We then will plant them into 72 cells and let them grow out until they start throwing up a few leaves and have formed a good root system, after which they are ready to start planting out.
Plant ranunculus into rich, well-drained soil. You don’t want them sitting in standing water, as ranunculus corms in particular are very prone to rot in overly moist environments. Alternatively if you plant them into pots or containers, use a free-draining potting mix - amending with perlite or other well-draining ingredients as needed.
Again, ranunculus should grow in cool temperatures - 50-60F is optimal - but not freezing temperatures. They will grow slowly during cooler temperatures, but will still grow. When planted in the ground outside, they won’t really put on any good top growth until the season really starts warming up, but they will continue to put on good root growth and create a really strong root system during the cooler conditions of winter and early spring.
We cover our ranunculus with floating row cover - doubling up on the layers when the temperatures start to dip down really low - and that seems to keep them plenty warm and prevents the ground from freezing during the winter.
As the temperatures grow warmer and the days grow longer, your ranunculus will start to put out more leaves and get bigger and bushier until they start putting out flower buds. 60-70 F degrees is ideal, because once it gets above 80 F the plants will start going dormant. The plants will stop flowering, their leaves will yellow and then the entire foliage will die off as they go fully dormant.
Harvesting
Ranunculus will start putting out buds with stems that will eventually lengthen over time. Some of the stems may be short initially - but they will continue to produce more buds and more stems over the next few weeks.
Ranunculus are best harvested when their buds are starting to show color and their texture is squishy - similar to a marshmallow in that it is a pillowy, soft texture, similar to peonies. This allows for the maximum vase life - sometimes up to two weeks!
Cut at the base of the stems down by the bottom of the plant. This will encourage more flowers to grow and obtain the longest stem possible too. Harvest into cool clean water and enjoy their fluffy colorful beauty.
Tulips
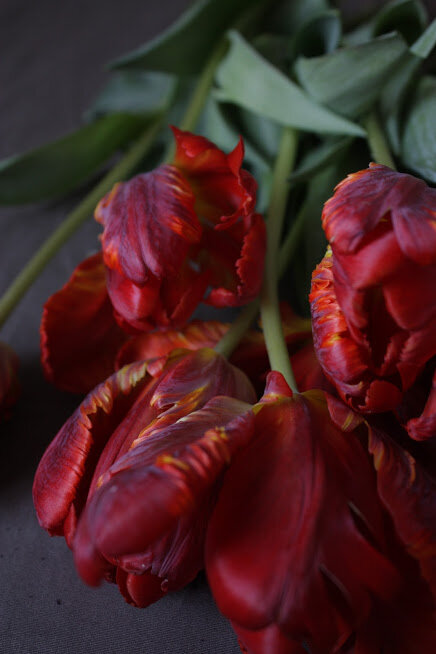
Tulips are the most commonly known flowering bulb of spring. Their distinctive form and big-petalled blooms are one of the most beautiful flowers in the world, and they do well in a wide variety of environments.
There are some tulips that will come back and bloom year after year. Varieties like Tulipa turkestanica will be dependably perennial - although they’re not quite as spectacular as the more fancy varieties of tulips, they are more likely to bloom, and are still very enjoyable. The Darwin Hybrid varieties of tulips are well known for reblooming as well, especially if you get nice and cold winters.
Cultivation
Tulips are best grown in areas where winter gets really cold - they require the longest chilling periods of any bulb at 16 weeks of 40 F- so the best and easiest way to chill them is to plant them in pots or in the ground where they can get a good period of freezing cold.
If you live in an area where it doesn’t get cold for long enough (we have a problem getting the recommended chill period here) you can either purchase pre-chilled bulbs (that have already been chilled by the seller for the recommended period of time) or chill them yourself in a cooler or a spare spot in the fridge.
When planting tulips, dig about 6” down and plant your bulb, pointy-side up. If you’re wanting to plant tulips en masse (either as a massive display or for cut flower sales), don’t bother with individual holes - dig a deep and wide trench, pack your tulips in, and then backfill with the dirt you removed.
Tulips will start to grow as temperatures warm up, starting with the foliage popping up first. The blooms will start to first form as small green immature buds first in the middle of the plant, and then will eventually start lengthening upwards into full mature blooms.
We find that the weather is usually very dry when our tulips start blooming - so we will give them a little additional water to ensure that they get longer stems and bigger petals. If you get regular precipitation and rain when your tulips start to form buds, then you probably don’t need to water your bulbs.
Harvesting
Tulips are mostly treated as annuals if you’re looking for a good quality cut flower with a nice long stem. Tulips aren’t the best at reblooming - the amount of energy it takes to produce a nice bloom that first year is substantial, so they won’t rebloom again like that for another couple of years (if at all).
For that reason, most professional growers of tulips as cut flowers will actually harvest the entire plant - bulb and all. This not only helps you to get great stem length, but also allows for you to remove the bulbs area and prevent you from having to dig them up later on.
If you so choose, you can replant the bulb even after removing it from the ground. Just know that it will take it a while to bloom again - we plant our tulip bulbs out in a grassy area where we don’t depend on them to bloom (and just feel lucky if they do!).
Tulips will last in the vase for a good five days or so if you keep their water clean. Their stems will actually elongate and grow when in the vase, allowing for your tulips to look even more elegant and graceful over time.
i hope this is getting you excited for spring blooms
I love planting bulbs and corms in the fall because it’s like sending a surprise gift to my future self - when they pop up in the spring, half of the time I forget that I had planted them (given how many bulbs and tubers and rhizomes we’ve steadily dug in over the years!)
There’s also nothing quite like the flowers of these bulbs and corms in the spring either - filling our home with the scent of freesias and hyacinths, the brightly colored blooms of anemones, ranunculus, narcissus and tulips and even the tiny single blooms of muscari and crocus are such a treat when nothing else is blooming and we are so starved for flowers.
I hope you find this information useful - I will try to write more species-specific guides in the future.
And if you’re interested in growing cut flowers professionally as a flower farmer (whether for design, wholesale, retail or subscription cut flowers), you may be interested in our eBook bundle for Flower Farmers!