How to Grow Icelandic Poppies - Stress free!
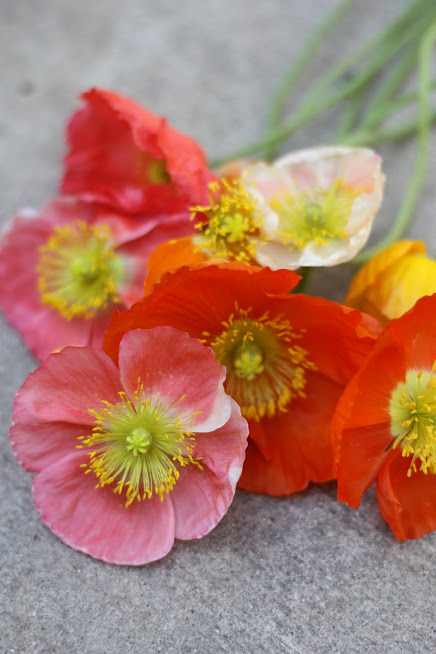
Icelandic poppies. Their papery translucent petals are the stuff dreams are made of. Like a crushed silk dress that slowly unfurls, there is something so romantic and yet exciting about their delicate petals.
They were, also for three years, my nemesis. For three years, I've tried to germinate thousands of seeds, and every single time, I have failed. Not a single flower to show for my attempts, I had to purchase my plants in.
Until this year. I finally cracked the code on growing Icelandic poppies!
This is important, because everybody loves Icelandic poppies. Growers, brides, florists, retail customers, horticulturists and amateur gardeners can't get enough of them. Even the average person who isn't that familiar with flowers will stop to take in a bouquet of Icelandic poppies.
Now, not all Icelandic poppies are created equal. For us flower growers, there are two varieties that stand out as far as cut flower materials due to their tall stems and coloration and excellent vase life.
The first is the series known as ‘Champagne Bubbles”, which is readily available and extremely prolific as a flower, throwing off masses of silky crinkled blooms.
The second is the ‘Colibri’ series. Bred in Europe by Italian Ranunculus, they were almost discontinued before exploding into popularity with floral designers. An entirely different breed of animal from the Champagne Bubbles, the Colibri poppies are taller, with larger blooms and thicker stems, appearing like an icelandic poppy on steroids

Both of these can be grown from seed, but many people seldom do, and it’s because they’re very a pain in the ass (to be put bluntly). There are a lot of issues along the way that can cause you to lose an entire crop.
That being said, it IS difficult, but not impossible. It took me three years to figure it out, but now I can consistently produce healthy transplants that will bear armloads of poppies this spring. I’ll share what I’ve learned in this guide.
1) Buy the correct seed
While there are many sources for Icelandic poppies, there are only a few for the two kinds we want for cut flower production. Both ‘Champagne Bubbles’ and ‘Colibri’ seeds should be primed, usually marked on the package. This is going to help you achieve much better germination overall.
I purchased my Champagne Bubbles seed from Geoseed, while I purchased my Colibri-ish seeds from Floret (her ‘Giant Peach’ and ‘Sherbet Mix’ are the same big poofy petaled blooms) and both have very good germination. I’m getting pretty close to 100% with my Champagne Bubbles, while around 75% with Floret’s.
If you want actual Colibri seeds, you’ll want to get in touch with Henk Onings. He is the sole representative for Italian Ranunculus for the U.S. - great guy, very friendly and great service and very knowledgeable and will hook you up with those beautiful poppy seeds.

2) Understand the timeline for growing poppies
Poppies are a sloooooow growing flower. They’re right up there with lisianthus, eucalyptus and snapdragons as far as taking forever from seed (interestingly enough, many of these same strategies can be used for success with the other species mentioned). It takes three to four weeks to get to the first true leaves, and nine weeks to get from seed to a transplantable plug, so realize that you’re in here for the long haul.
It’s important to plan things out so your poppies also have a long period of cool/cold establishment. They can handle cold pretty well, but they do NOT handle heat well at all, and will produce much better quality flowers with long stems and bigger blooms if you can give them a long, slow, cool establishment period after planting them out. They do great planted into an unheated hoophouse, planted into the field in fall, or planted out into the field in late winter/early spring.

3. Plant into the correct medium
Icelandic poppies, because they are such slow growers require a different medium compared to quicker growing plants. They are particularly prone to damping off, which will cause them to keel over.
We had issues with damping off and mold initially when we started growing flowers and using compost-heavy mixes. While great for supplying nutrients and a great start for many flowers and plants, they are full of contaminants that can cause fungus and bacteria to attack your poppy seedlings. You want something that is soil-less, something that is basically just a plain growing medium with no fertilizers or additives. No nutrients = nothing for fungus or bacteria to feed on = no damping off or fungal issues. The poppy seeds should have all they need to germinate and get to their first set of leaves.
We switched to Promix last year - a fine sterile soil starting mix that we buy in bulk for seed starting (from a local hydroponic supply store where they are particularly friendly). If you’re not starting thousands of seeds, you may want to just purchase a smaller amount on Amazon for starting your poppies.
4. Plant into the correct container
I’ve tried many kinds of containers over the years. 72 cell trays , soil blocks, 4 inch pots, 2 inch pots, and had so many many issues.
72 cell or larger cause issues because it’s too big of an amount of soil, and the poppies usually flop over. You may be able to sow directly into modules that are smaller - 128’s for instance -but I’ll share my method here that will be a bit more efficient.
I prefer to sow into row trays - the shallow kind - due to both effectiveness in growth and efficiency in space. Germinating the poppies into the row trays allows for me to grow them out to true leaf stage easily, and makes for easy bumping up into 72 cells later on.
Pack your promix into your row trays nice and firm, then moisten evenly. Sprinkle the seeds in a relatively even distribution, then cover with a humidity dome. I used a high-tech method of setting mine on the floor of my house at about 70 degrees, but you can also use a heat mat or germination chamber as well.
Make sure to check your seeds every couple of days. The seeds should pop up in about 4-5 days. If they don’t germinate, try increasing the warmth a little bit. Make sure that the seeds stay moist, but not wet.
5. Grow to first true leaf stage

You should have a happy little collection of poppy sprouts. Be excited, be happy, because it gets easier from here on out! Well, kind of. The next step is to get them to the first set of true leaves, which will take a couple weeks usually.
Now, the important thing is that we have to change environments. Your poppies cannot stay in the warm and happy place where they germinated - they will either succumb to rot and fungus, or they will dry out.
You will have to move poppies out to someplace with bright light and cool temperatures. I use an unheated garage under a shop light, but other options would include an unheated high tunnel or greenhouse or cold frame. It’s important that you keep them sheltered out of the wind to prevent them from drying out, so don’t put them out in the open.
It’s also important that you give them a little food at this time. Given that you’re growing them in Promix, they will run out of nutrients pretty quickly. I spray them with a dilute mixture of fish emulsion, a couple drops per cup, enough to give them some nutrients to get to the first true-leaf stage.
Once they’ve sprouted their first true leaves, it is time to pot them up.
6. Pricking and potting up the poppies

Once you’ve got the poppies all grown to their first true leaf stage, you can start transplanting them into bigger containers. We pot ours up to a 72 cell tray, but you could also bump up into 128’s or smaller cells if you want to (we’re currently experimenting with a 128 tray).
First fill up your new containers with potting mix. You can use your standard potting mix at this time, although we still use ProMix and water with fish emulsion from here on out. I only use the dry mix at this point, since it handles more easily than wetted mix.
To pop the poppies out of the row tray, take a chopstick and slide it gently underneath the soil in the row tray - your poppy seedlings should rise up and allow you to easily grab hold of the individual seedlings.
Now it’s important when transplanting little seedlings to only grab hold of them via the leaves. Don’t try to grab them via the stem or the roots, because even just a little bit of damage at this stage can mean your poppies are done for - the leaves, despite appearing delicate, are the most sturdy part of the plant right now.
The roots may be a bit tangled if the seeds are close to each other. When they’re intertwined, I usually will just pot up both seedlings as opposed to untangling them. Again, remember that the roots are very delicate, and you don’t want to handle them roughly.

Take a dibber (we use a wooden chopstick, although a finger works just as well) and make a deep hole, a couple inches deep in the potting mix, long enough for the root to go in. Carefully lower the seedling into the hole, ensuring that you don’t bend or coil the root. Gently push in around the leaves, burying it all the way past the stem until you only see the top two leaves sticking up out of the soil, like little bunny ears ^^.
Water them in by bottom watering - either submerging the flat in a tub of water, or using a non-perforated tray. You can’t overhead water due to the little seedlings getting crushed by even a light stream of water, so remember to bottom water until the plants are more established.
7. Grow them out for 4-6 more weeks

Give a nice spray of fish emulsion and kelp solution and let them sit for a bit longer. I like to keep them in the unheated garage under light for another week or so to let the roots grow, then they go out to harden off and grow under filtered sunlight in the cold frame. Again, remember to keep them in bright but cool conditions - this year is the perfect time of year for us - to allow them to grow nice and full and bushy.
Give them another month or so, and you should have happy and healthy poppy plugs to plant out! I like to let them really fill out the plugs if possible, although if it is getting too late in the season, I’ll just dump them out and plant them if I’ve run out of time. Let them grow on, and you should have those fantastically hairy buds that explode into glorious poppies in a few short weeks!

8. Harvest your Icelandic Poppies
Poppies will usually bloom in the AM, so try and get out there in the early morning. It depends on the heat and sun, but they will usually “pop” open within the same hour.
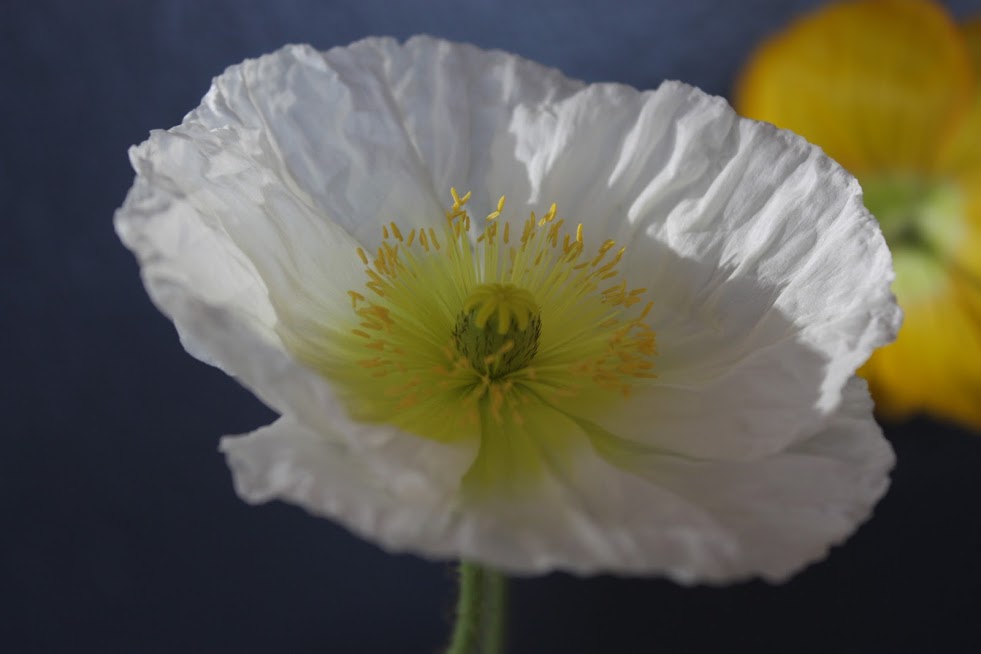
For the maximum vase life, we pick Icelandic poppies when they are just starting to enter what we call the “cracked bud” stage - when the furry covering splits just enough to show the color of the petals inside, but before it fully splits open (once the poppy completely opens, the vase life is greatly reduced and the petals can be damaged by wind and precipitation)
Sometimes we find that the little furry coverings take a little bit of help to open up. As in the covering will start to split - but they may not pop off completely. We’ll gently (very gently) tease the covering off, and the poppies will unfurl a short time later.
To condition them, harvest the poppies into cool and clean water. We found that although conventional advice has been to sear the cut ends of the poppies in open flame or hot water for maximum vase life, we don’t find it necessary - they last well when harvested correctly.
Then enjoy your poppies! We usually get 5 days (sometimes only 3-4 if I harvest too late) and you’ll find that the poppies will rotate around and move as they continue to grow and move in the vase.
9. Arranging with Icelandic Poppies
Icelandic poppies lend themselves well to arranging since their stems are very architectural and their form is a compound form - a daisy-like flower with petals radiating out from the center, with that center grabbing the attention from the viewer.
I personally prefer to use Icelandic poppies on their own - they make for the most beautiful minimalist floral arrangement with just a few stems arranged into a Japanese pinfrog or kenzan creating quite the most wonderful design.

If you’re combining them with other flowers, you’re in luck - they pair just as well with conventional spring flowers like ranunculus and anemones as they do with other blooms like roses and peonies. They also combine well with other “wildflower” type flowers like strawflowers, bachelor buttons, corn cockle and larkspur.
I hope that this guide helped you demystify the process of growing Icelandic poppies! Loved, yet infamous (for flower growers) at the same time, they really aren't that difficult to grow once you understand a few key points about them. I hope that you are able to grow some awesome poppies this year!
As you can tell, I really love Icelandic poppies. They are hands-down one of my favorite flowers to grow and to design with, and are a favorite flower of our design and wholesale floral clients as well.
If you are interested in doing more than just growing flowers as a hobby - perhaps you want to grow flowers as a side hustle, or you want to start a business growing and designing an working with flowers - you should check out our eBook series.
Our series of eBooks that are jam-packed full of information on planning, growing, harvesting, designing with and selling and marketing cut flowers, we’ve been able to help hundreds of people become successful flower farmers who are living a flower-filled life!
Especially if you’re just starting out growing cut flowers or are a new flower farmer, you will find these books highly useful and well worth the investment!